Design a site like this with WordPress.com
Get started

Re-enabling Change Filament On Ender 3 Pro

I was playing around with a new Ender 3 Pro at the maker space and noticed the Change Filament option was gone. This option was useful because it would eject filament instead of having to pull it out by hand when you wanted to change it. Our other Ender 3 Pro has a mini USB plug, but this one has a micro USB plug.

Left: micro USB = old 8-bit board, Right: mini USB = new 32-bit board

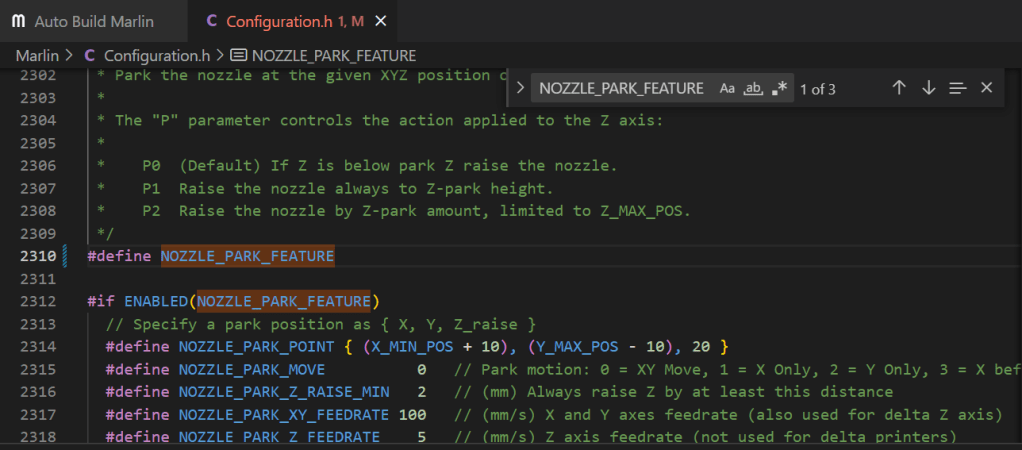
That got me into researching the new 32-bit boards for this printer and how they disabled the Change Filament feature. I learned about the Marlin firmware, Marlin Auto Build, and its custom configurations. It’s a bit complicated, but this Youtube video helped a lot by walking through the process. I used bugfix-2.1.x branch, copied the contents of Configurations\config\examples\Creality\Ender-3 Pro\CrealityV427 configuration to the Marlin directory, built the firmware, copied it to a SD card, and installed it, but the Change Filament option still wasn’t there! I found this post explaining that the ADVANCED_PAUSE_FEATURE and NOZZLE_PARK_FEATURE had to be enabled. The first feature was enabled, but I had to uncomment the second one in Configurations.h.

I rebuilt the firmware and Change Filament is still not showing up. Guess I’ll have to keep looking into this…

Advertisement

How to fix `The following signatures couldn’t be verified because the public key is not available: NO_PUBKEY`

You might have run into this error when updating packages. The error is probably because you don’t have the public key corresponding to whatever private key the package was signed with. Hopefully, you can just download the public key from keyserver.ubuntu.com and get on with your day. In my case, it was a Google SDK key 8B57C5C2836F4BEB that was missing. Just use the following command, replacing the key ID with the key you need.

sudo apt-key adv –keyserver keyserver.ubuntu.com –recv-keys 8B57C5C2836F4BEB

Now, sudo apt-get update should just work. If it doesn’t, feel free to leave a comment.

Set up Ubuntu 22.04 Server 64-bit on Virtualbox 6.1

Download the Ubuntu ISO here.

Create a new VM. Here’s the specs I use.

  • 2 GB RAM
  • 25 GB HDD, dynamically allocated

Once the VM is created, configure a few more properties.

  • In System, increase CPUs to 2, and enable PAE
  • In Storage, attach the Ubuntu ISO to the optical drive
  • In Network > Advanced, set up a port forwarding rule TCP 2222 to 22 for SSH

Start up the new VM and follow the installation prompts. Once installed and rebooted, pause the VM and restart in headless mode.

I ran into errors during installation which I worked around by disabling the network interface for the installation.

From your host CLI, copy a SSH key to the VM.

ssh-copy-id -i ~/.ssh/id_ed25519 user@localhost -p 2222

Don’t have a SSH key?

Generate one.

ssh-keygen -t id_ed25519

Log in to your VM.

ssh user@localhost -p 2222

Do you need to set up a web proxy?

Configure it in /etc/apt/apt.conf and /etc/environment.

sudo tee -a /etc/apt/apt.conf <<EOF
Acquire::http::Proxy "http://proxy.example.com:8080";
Acquire::https::Proxy "http://proxy.example.com:8080";
EOF
sudo cp /etc/environment /tmp/environment
sudo tee -a /etc/environment <<EOF
http_proxy=http://proxy.example.com:8080
https_proxy=http://proxy.example.com:8080
HTTP_PROXY=http://proxy.example.com:8080
HTTPS_PROXY=http://proxy.example.com:8080
EOF

Update packages.

sudo apt update && sudo apt upgrade -y

Set up automatic updates

Install unattended-upgrades. This will update your OS automatically.

sudo apt install unattended-upgrades -y sudo systemctl enable unattended-upgrades

Back up original configuration, then enable updates, email notifications, remove unused packages, and automatic reboot.

sudo cp /etc/apt/apt.conf.d/50unattended-upgrades /tmp/50unattended-upgrades
sudo sed -i 's/\/\/"${distro_id}:${distro_codename}-updates";/"${distro_id}:${distro_codename}-updates";/' /etc/apt/apt.conf.d/50unattended-upgrades
sudo sed -i 's/\/\/Unattended-Upgrade::Mail "";/Unattended-Upgrade::Mail "me@example.com";/' /etc/apt/apt.conf.d/50unattended-upgrades
sudo sed -i 's/\/\/Unattended-Upgrade::MailReport "on-change";/Unattended-Upgrade::MailReport "only-on-error";/' /etc/apt/apt.conf.d/50unattended-upgrades
sudo sed -i 's/\/\/Unattended-Upgrade::Remove-Unused-Kernel-Packages "true";/Unattended-Upgrade::Remove-Unused-Kernel-Packages "true";/' /etc/apt/apt.conf.d/50unattended-upgrades
sudo sed -i 's/\/\/Unattended-Upgrade::Remove-Unused-Dependencies "true";/Unattended-Upgrade::Remove-Unused-Dependencies "true";/' /etc/apt/apt.conf.d/50unattended-upgrades
sudo sed -i 's/\/\/Unattended-Upgrade::Automatic-Reboot "false";/Unattended-Upgrade::Automatic-Reboot "true";/' /etc/apt/apt.conf.d/50unattended-upgrades
sudo sed -i 's/\/\/Unattended-Upgrade::Automatic-Reboot-Time "02:00";/Unattended-Upgrade::Automatic-Reboot-Time "02:00";/' /etc/apt/apt.conf.d/50unattended-upgrades

Apply the changes.

sudo systemctl restart unattended-upgrades

Take a VM snapshot.

Want to install Docker?